Discover how to automate social media posts using X (Twitter) as an example. Explore using Make.com, Perplexity, and ChatGPT to create an autoposting process. This is an introductory article for those that are just getting started with the topic of automation.
Read about automating social media posting in this guide for those who are starting to figure out how to create quality content for social media. Learn what and how you can and should do.
These days, social media has become an indispensable tool for communication, marketing, personal brand promotion and business development. Whether you’re a business owner, content creator, or just like to share something interesting, maintaining an active social media presence can be rewarding but time-consuming and labor intensive.
This is where automation can help us. But not to replace thoughtful creation of useful content at all! It’s to simplify the social media experience by shifting routine operations to automated platforms and tools.
Why automate
Before we dive into the “how,” let’s tackle the “why.” So, why automate social media posting? Today, automating social media posting has gone beyond just posting content on a schedule and offers several important benefits:
Consistency: Automation helps you maintain a regular posting schedule, keeping your audience engaged and your profile active. Of course, profile authority depends on the content, quality, and level of expertise. Nevertheless, all things being equal, people prefer to subscribe to those sources and social media profiles that publish content regularly.
Saving time: By automating repetitive tasks and routine activities, you free up valuable time to focus more on strategy and content creation. On what really creates value for your readers. Plus you create efficient workflows for deferred posting, too.
Optimal Timing: Automation tools can publish posts at peak times of traffic and engagement, even if you’re busy or unavailable at those times. This allows you to present your information at the most convenient time for your readers, thereby increasing your reach to your target audience.
Maintaining Quality: Contrary to popular belief, automation does not mean sacrificing quality. With the right approach, it will help you maintain high standards at all times. You’ll be able to use the time freed up to understand what content gets the most response.
In this guide, we’ll look at how to set up X (Twitter) posting automation. However, you can apply these principles to other social media platforms as well. The goal is not to flood your feed with low-quality content, but to save you time by automating what you used to do manually - finding trending topics, creating and sharing engaging posts. And it’s about delivering quality content to your subscribers at the best time for them.
Automation Platform
We will be using Make.com for automation. I’m giving an affiliate link here because when you sign up using it, you’ll get a free Pro level for a whole month and plus another 10,000 operations! With a normal account registration, only 1,000 operations are available each month. Who would have given me a link like this before…..
If you want to learn about other solutions, read about the most popular platforms for posting automation. The choice is yours as always, although I think Make is a pretty powerful platform and it allows you to create sophisticated and efficient automation workflows without requiring extensive coding knowledge.
Why else did I choose Make? I liked the following:
User-friendly visual interface
Wide range of application integrations
Flexible and customizable workflows
Good free tier to get started
Availability of a large number of manuals online
Large community where you can find support
The project is actively growing and developing
To get started, create an account at Make.com. Once you log in to the platform, you’ll be greeted by an intuitive interface where you can start creating your first “script” - what Make calls an automation workflow.
Example of Make interface
Workflow design
Let’s divide our X (Twitter) posting automation workflow into the following main steps:
Data management
Trend research
Content generation
Posting and logging
Notification
1. Data management
With automation, there is a high probability that AI can generate the same topics for further processing. On the one hand, this is due to the fact that really important news doesn’t happen every day, and on the other hand, AI is not yet good at handling random numbers. If you can share your experience with using random numbers in AI, please let me know.
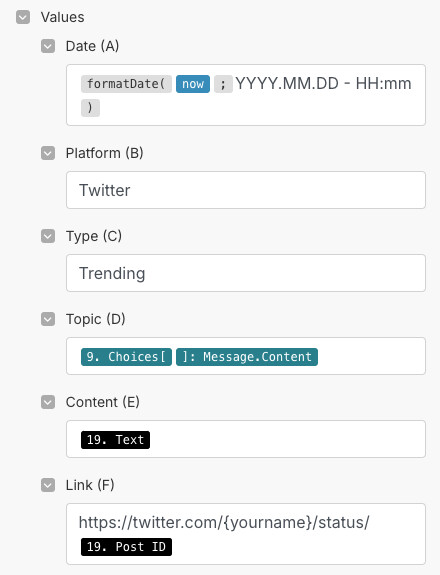
To summarize, we need to somehow keep track of already published posts so that we don’t spam the same topics or even posts. So we will be using Google Sheets to keep track of published tweets. This also allows us to easily view a log of our social media activity. Instead of Google Sheets, you can use any other solution or the built-in data storage in Make itself.
To read and record information, learn how to connect Make with Google Sheets. Tip - create a file in Google Sheets ahead of time with columns for date, topic, tweet content, links, and other metrics you need. This will make it easier to analyze performance over time.
So, the first step in our script is to get a list of topics we’ve already written about. When you run the script for the very first time, it will of course be empty. So in the settings of this step, you need to make sure that this will not cause the whole script to stop running. Alternatively, just enter the first entry manually.
2. Trend research
Now we need to organize the search for trending and interesting news to share with our audience. For this we will use Perplexity.ai. This is a rather powerful search engine based on artificial intelligence. It is good because it knows how to intelligently search for information on the Internet.
In the Prompt, we need to specify that we’re looking for relevant topics in technology, programming, or whatever niche you’re targeting. And in the Make script, we need to set up the Perplexity module, which will request and receive a list of current, relevant topics.
Here’s the sequence of steps:
Task Perplexity to search for trending topics
Filter out topics we’ve already posted about
Select a random topic from the remaining list
Below is an example of my prompt for Perplexity, which after much trial and error produces acceptable answers:
Find the 10 most popular topics in the last 7 days in programming, technology and emerging areas of interest to developers and IT enthusiasts.

Use topical data sources such as Twitter, Google Trends, Stack Overflow, GitHub, Reddit, TechCrunch, Y Combinator, YouTube, academic publishers, and Google search results.

Eliminate all topics mentioned in [link to list from Google Sheets]. From the remaining topics, pick one random topic.

Output only the selected topic as a single line of plain text, without any additional text, your comments, or formatting. Make sure the output does not contain bold text or special characters such as ** or __.
The last paragraph is needed because Perplexity “likes” to comment its output. If you don’t ask him to, he may write along the lines of “Here’s a list of hot topics I found…”. We don’t need this in our output, so we have to add such an order. If you don’t do this, all the subsequent generated information will look strange and unambiguously give away its artificial origin.
3. Content generation
Now let’s move on to generating the text of the post itself. For this you can use any platform of your choice. For example, again Perplexity or OpenAI. Of course, Perplexity can not only search for information, but also generates the text itself perfectly. For this you can choose the LLM (large language model) of your choice. Here you will find list of models supported by Perplexity.
Once we have a topic, we use the chosen platform and LLM (large language model) to create the content of our post. The key is to put together the right command (prompt) so that the generated content fits your style and meets your quality standards or wishes. Here’s an example of a prompt that you can use as a basis:
Please create a professional Twitter post about [topic from step 2] based on information no older than one month.

Consider the following guidelines:

- Avoid using emoji in the first sentence.
- Write in a casual but professional tone.
- Avoid opening phrases like "Great news for..." or similar clickbait.
- Avoid using "just" or "was" as the first word.
- Use appropriate hashtags (2 or 3) related to the topic.
- Avoid jargonisms unless they are necessary and industry specific.
- Don't exceed a total length of 250 characters.
- Make sure the text is presented in plain text, without formatting or special characters such as ** or __.
Remember, the goal is not to create completely artificial tweets that are visible that they were generated by AI, but to use AI as a tool to speed up the content creation process. So it’s best to always monitor and, if necessary, correct the generated content to make it fit your style and standards.
The best practice for this is to create a special checkbox to mark the generated but not yet published content. That way you can review it and correct the text if necessary. Then change to “Ready to Publish” or “Approved” status and then in the next step, the automation process will publish the content.
However, this is a more advanced version of automation, which we’ll cover in later articles. So check out this blog often and subscribe to our social media channels. They are listed on the home page.
4. Posting and logging
The penultimate step in our process is to publish the tweet and log the published post to Google Sheets or other storage.
Here are the simple steps to do this:
‼️ Note that Make.com officially discontinued direct integration with X (formerly Twitter) as of April 3, 2025.
Post to Twitter: In Make, you need to set up a Twitter connection once. This can be done right when setting up the script or in advance. The connection will allow the script to post tweets directly to your account.
Google Sheets: Once the tweet is published, you need to update your list of posts by adding a new entry. You need to do this so that the next posts don’t repeat the ones already published. We already have all the necessary information for this. So all you need to do is just paste it into the correct fields.
Google Sheets fields
5. Notification
Notification to Telegram, WhatsApp or any other messenger is an optional step that is added for convenience. When the automation is set up and working, there is no need to follow the script every time. But when you receive a message, you immediately see what was posted and when. And with the attached link, you can go straight to the post and correct or delete the post if necessary. Another convenience is that you can reply to comments right away if you have a large audience and they start writing them right away.
Problems and Solutions
Automating posting to social networks is only at first glance so simple. In practice, it is not without its challenges. Here are some common obstacles and how to overcome them:
Maintaining Quality: Always remember that automation is a tool, not a substitute for your personal opinion or thinking. Check your published posts regularly and refine prompts and optimize processes as needed.
Platform Limitations: Each platform (Twitter, Make, OpenAI, etc.) has its own peculiarities and limitations. This requires you to periodically look at the platforms’ documentation and be prepared to adapt your process as needed.
Avoid repetition: The option of storing published topics in Google Sheets to avoid repeating topics and tweets has worked so far. But it can also fail sometimes. A couple times I’ve deleted posts that were one-to-one repeats. If there are better options, let me know.
Balance between automation and authenticity: While automation can handle posting, don’t forget to set aside time to actually interact with your audience. Respond to comments, participate in discussions, and share spontaneous thoughts along with posting automated content.
Tips & Tricks
Develop effective AI prompts: When using OpenAI to create tweets, be specific in your prompts. Instead of “Write a tweet about artificial intelligence,” try “Write a tweet about the latest developments in artificial intelligence and their potential impact on labor markets in an informative yet conversational tone.”
Humanize AI-generated content: Always review and tweak AI-generated content. Add your personal touch, change the tone, or include relevant hashtags to make the content truly yours.
Experiment and improve: Don’t be afraid to experiment with different process options, prompts, and posting schedules. Use data from your list of published posts to figure out what works best for your audience.
Diversify content: While automation can handle regular posting, don’t forget to add fully manual posts as well, especially when it comes to time-sensitive or personal updates.
More Use Cases
The principles we’ve discussed for automating social media posting can be extended to a variety of business applications:
Content Marketing: Automate the distribution of blog posts or articles on various platforms.
Customer Service: You can set up automated responses to common queries, freeing up time to deal with more complex issues. Although, of course, this task is more suited for chatbots.
Generation of leads: You can create processes that automatically refer customers based on their interactions with your content.
The possibilities are huge - let your imagination and the needs of your business run wild!
Conclusion
Automating your social media posts isn’t about replacing your voice with a robot, it’s about amplifying your voice and expanding your audience reach while saving time. Sophisticated automation will allow you to maintain a consistent and quality social media presence that engages your audience and achieves your goals.
Remember, the key to successful automation is balance. Use these tools for repetitive tasks, but always supplement your content with a unique vision and genuinely engage with your audience.
 as an example. Guide to automating social media posting with Make.com and ChatGPT.")