Compare modern face detection and tracking models by key criteria: speed, accuracy, and deployment ease. Real Python code examples, performance optimization tips, and ethical AI considerations.
Face recognition is a key technology powering countless solutions: from smartphone unlocking to complex security systems. Today’s market offers dozens of models, each promising high accuracy and speed. But how do you navigate this diversity and choose the right one for your project?
Whether it’s a mobile app with real-time face recognition or a surveillance system with high accuracy requirements, choosing the right model is critical. Studying comparative tests and reviews of leading face detection and tracking algorithms is the first step toward effective technology implementation. This approach will not only save resources but also achieve stable and fast performance in real-world conditions.
Introduction to Technologies
Performance Landscape
Modern face detection models can be categorized by performance levels based on their speed-to-accuracy ratio. Comprehensive testing shows that leading algorithms have achieved impressive results: they provide high processing speeds without significant accuracy losses.
This opens possibilities for their use even in applications with strict response time constraints - from mobile devices to edge devices in surveillance systems (click the image to open the enlarged version).
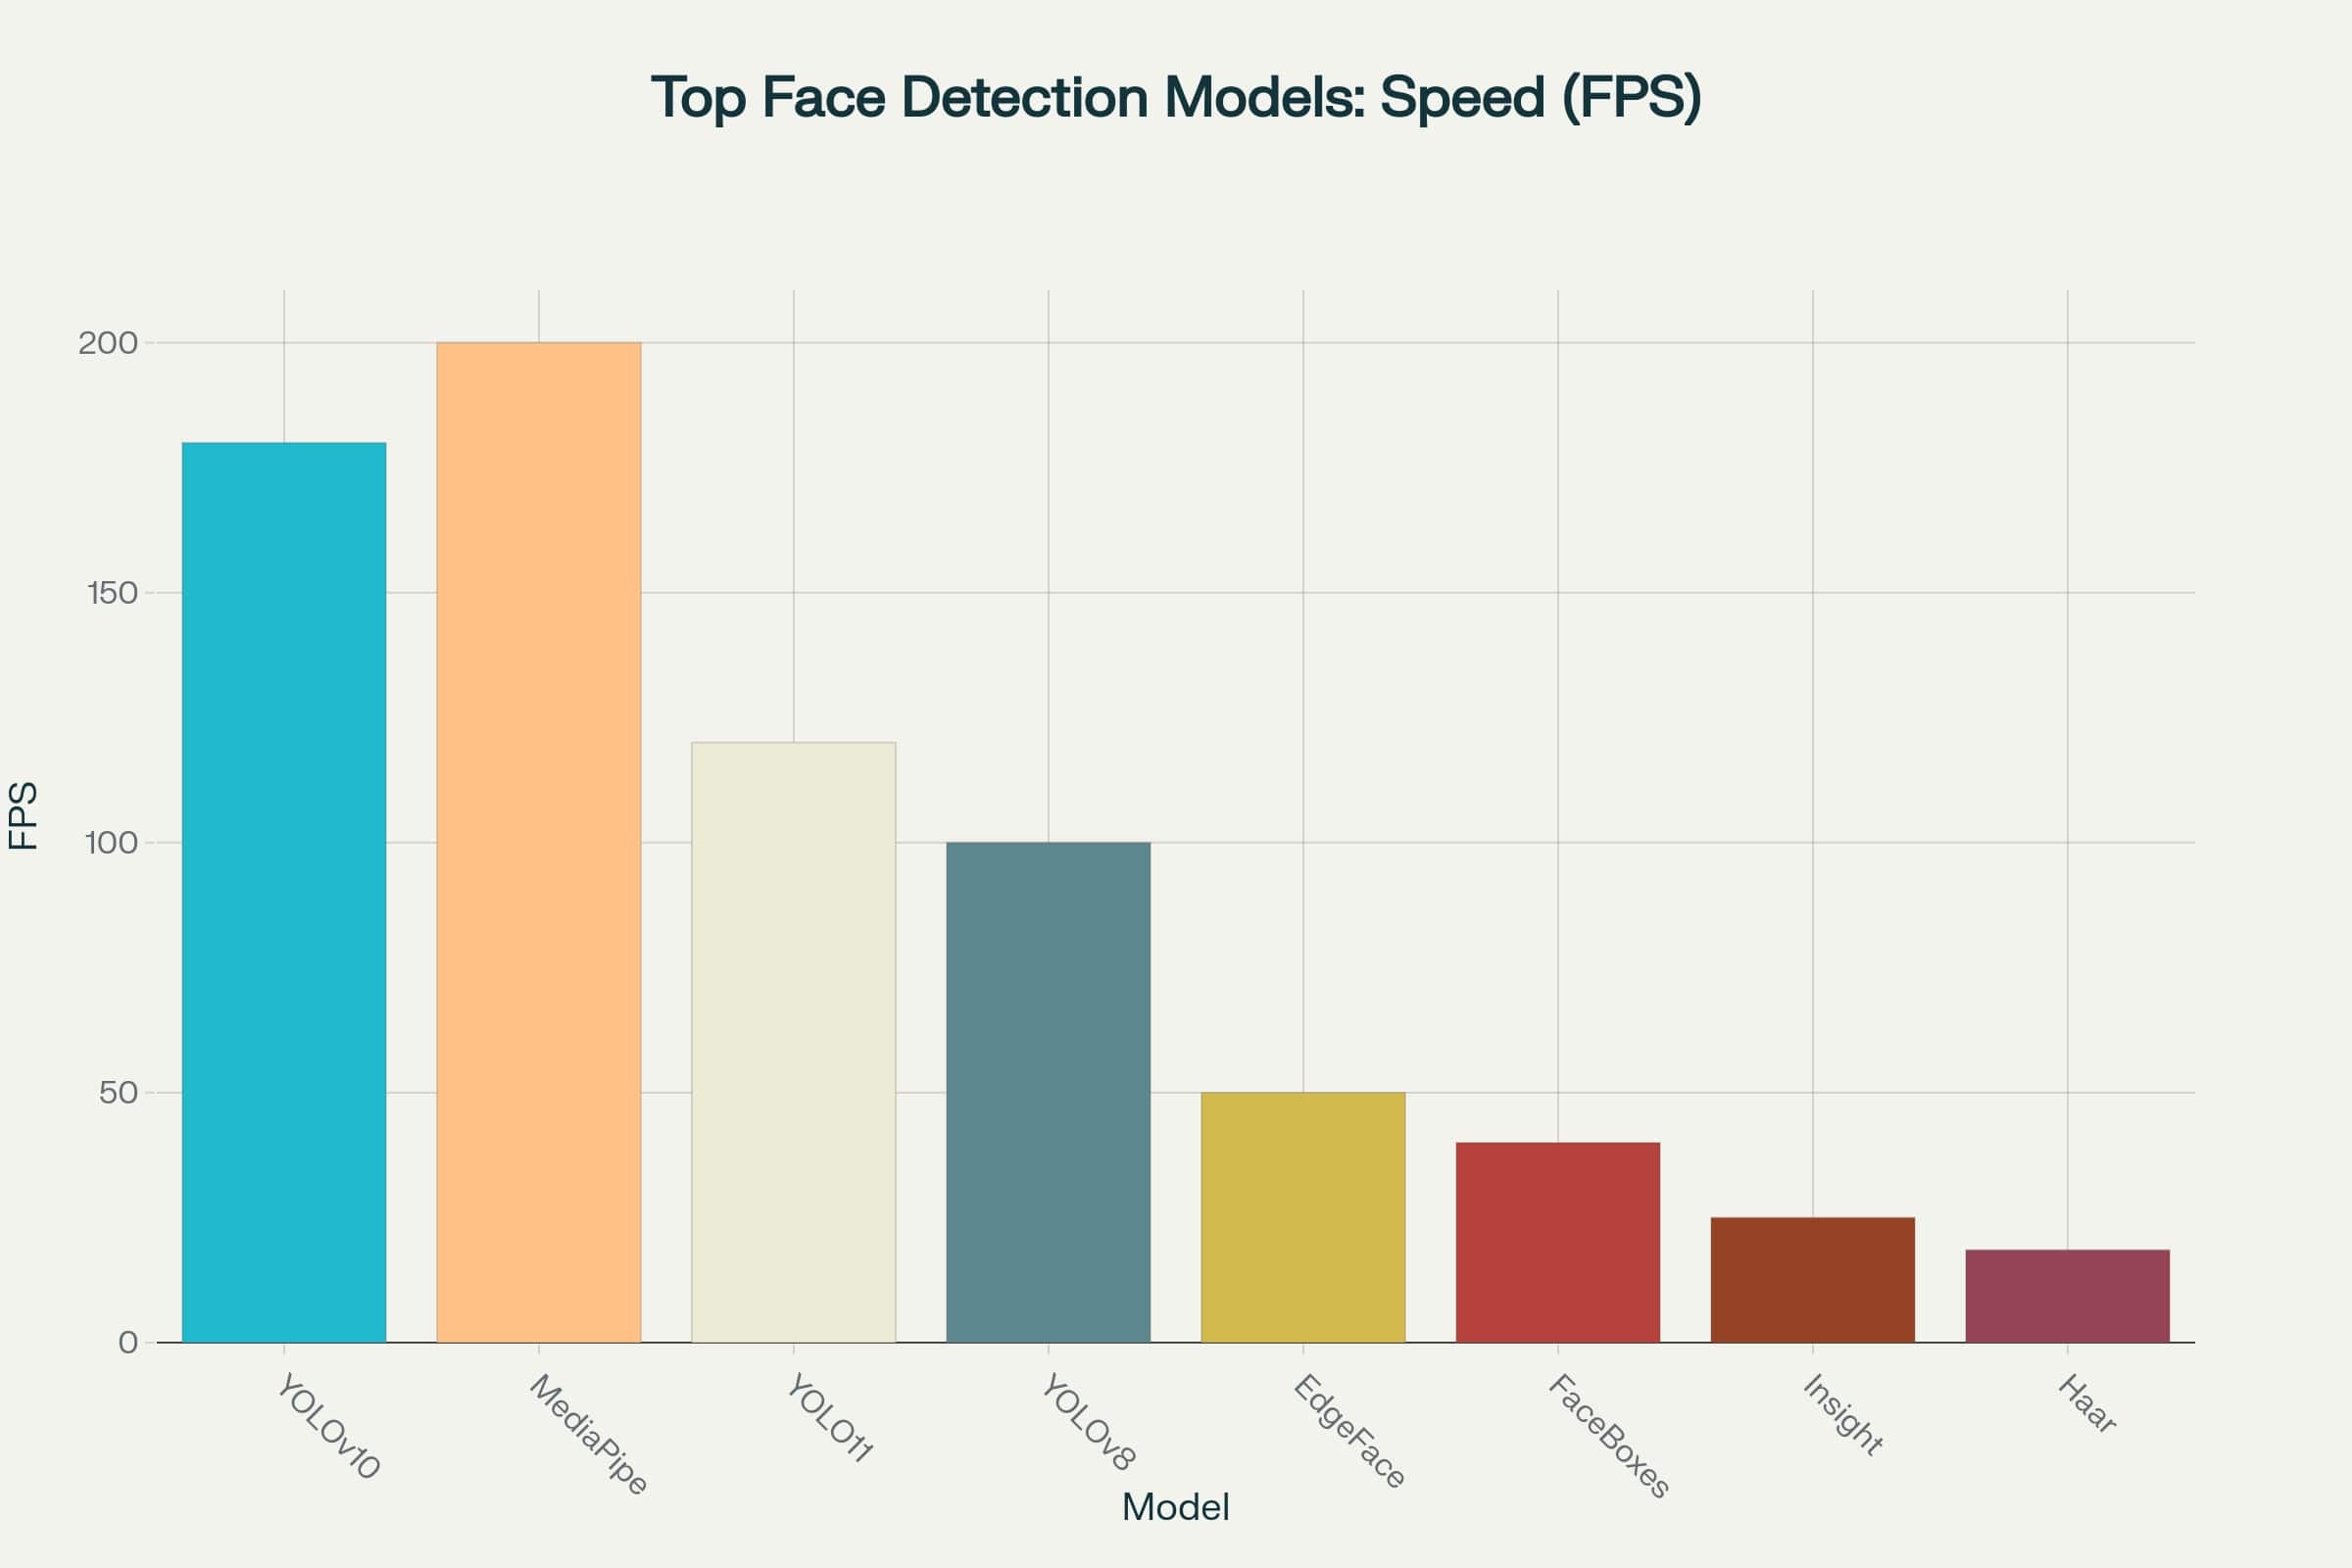
Speed chart of top face detection models
If you focus purely on speed, MediaPipe and YOLOv10 look like clear favorites, processing 180 to 200 frames per second. This makes them excellent choices for real-time tasks where minimal response time is crucial.
However, high frame rates aren’t everything. Without sufficient accuracy, even the fastest model can prove ineffective. For example, in surveillance systems or biometric identification, slower but more accurate models still have their advantages.
Model Trade-offs
When analyzing the speed (FPS - Frames Per Second) versus accuracy (mAP - mean Average Precision) chart, models group into distinct clusters, reflecting key trade-offs in face detection: increased accuracy often comes with reduced speed, and vice versa.
Performance chart of top face detection models
This diagram reveals four distinct model categories:
CPU-Only (gray dots) - models like Haar Cascade and DLib HOG provide baseline performance without needing GPU. They don’t excel in speed but are perfect for resource-constrained devices and embedded systems.
Lightweight (blue dots) - these include MediaPipe BlazeFace and various YOLO versions. These models offer excellent processing speed with reasonable accuracy, making them optimal for most real-time applications.
Medium (orange dots) - models like InsightFace SCRFD and EdgeFace provide enhanced accuracy at moderate speeds. They’re chosen when accuracy matters but decent performance must be maintained.
Heavyweights (red dots) - such as RetinaFace and DSFD. These models demonstrate research-level accuracy but require significant computational resources. They’re designed for mission-critical tasks where high hardware load is acceptable.
Practical Implementation
Here are several Python code examples for working with different models. As you can see, it’s not that complicated - the basics are quite simple:
Quick Start with YOLOv8-Face
YOLOv8 represents an excellent balance between performance and ease of use. This model is perfect for beginner developers.
fromultralyticsimportYOLOimportcv2# Load the modelmodel=YOLO('yolov8n-face.pt')# Process a single imageresults=model('path/to/your/image.jpg')# Process video streamcap=cv2.VideoCapture(0)whileTrue:ret,frame=cap.read()ifnotret:breakresults=model(frame)annotated_frame=results[0].plot()cv2.imshow('Face Detection',annotated_frame)ifcv2.waitKey(1)&0xFF==ord('q'):breakcap.release()cv2.destroyAllWindows()
Mobile Platform with MediaPipe
MediaPipe is optimized for mobile platforms and provides stable performance even on mid-range devices.
importmediapipeasmpimportcv2# Initialize MediaPipe Face Detection oncemp_face_detection=mp.solutions.face_detectionmp_drawing=mp.solutions.drawing_utilscap=cv2.VideoCapture(0)# Use 'with' operator outside the loop for proper resource managementwithmp_face_detection.FaceDetection(model_selection=0,min_detection_confidence=0.5)asface_detection:whilecap.isOpened():success,image=cap.read()ifnotsuccess:print("Ignoring empty camera frame.")continue# To improve performance, optionally mark the image as not writeable# to pass by reference.image.flags.writeable=Falseimage=cv2.cvtColor(image,cv2.COLOR_BGR2RGB)results=face_detection.process(image)# Draw face detection annotations on the image.image.flags.writeable=Trueimage=cv2.cvtColor(image,cv2.COLOR_RGB2BGR)ifresults.detections:fordetectioninresults.detections:mp_drawing.draw_detection(image,detection)cv2.imshow('MediaPipe Face Detection',image)ifcv2.waitKey(5)&0xFF==27:# ESC keybreakcap.release()cv2.destroyAllWindows()
Advanced with RetinaFace
For tasks requiring maximum accuracy, RetinaFace remains the gold standard in face detection.
Face tracking is a process of continuous face monitoring in video sequences that goes far beyond simple one-time detection. Unlike detection, tracking requires stable face identification across multiple frames, placing high demands on algorithm performance.
The chart shows a comparison of popular tracking models by two key metrics:
Processing Speed (FPS) - frames per second, determining model performance
Accuracy (MOTA score) - an integrated tracking quality indicator accounting for identification errors
What is MOTA?
MOTA (Multiple Object Tracking Accuracy) is a key metric for evaluating object tracking quality (including faces) that considers three main error types:
False Positives (FP) - false detections (tracker found a non-existent object).
False Negatives (FN) - missed objects (tracker didn’t find a real object).
ID Switches (IDs) - identifier switches (tracker “confused” object labels during crossing or temporary disappearance).
Calculation Formula
$$
MOTA = 1 - \frac{\sum (FP + FN + IDs)}{\sum \text{Total number of objects in each frame}}
$$
Features
Value range: from $-\infty$ to 1 (closer to 1 is better).
Example: MOTA = 0.85 means the tracker made errors in 15% of cases.
Integral indicator: combines all main tracking errors into one score.
Critical for surveillance tasks, behavior analysis, and autonomous systems where identification stability is important.
Difference from Other Metrics
MOTP (Multiple Object Tracking Precision) - evaluates object localization accuracy but doesn’t account for identification errors.
IDF1 - focuses on correctness of ID matching between frames.
For your chart, high MOTA in a model (e.g., FairMOT or ByteTrack) indicates its reliability in complex scenes (e.g., with face occlusion or lighting changes).
Among the presented solutions (Deeperport, FairMOT, ByteTrack, and others), there’s significant performance variation - some models show high speed at the expense of accuracy, while others provide precise tracking but work slower.
Optimal model choice always depends on the specific task: real-time applications prioritize speed (FPS), analytical systems prioritize accuracy (MOTA). Hybrid approaches (e.g., FaceTracker difu) are particularly interesting, attempting to balance these conflicting requirements.
Comparison of top face detection models
ByteTrack demonstrates the best speed-accuracy balance: at a record 171 FPS, it maintains a high MOTA score. This makes it the optimal choice for real-time systems where both performance and stable object identification are critical.
For mobile applications focused on smooth UX, face recognition speed is critically important - models with 30-60+ FPS working even on weak devices are optimal here.
Why is this important?
No lag: 60 FPS = processing each frame in 16 ms (smartphone screen refresh rate).
Energy efficiency: Small models (e.g., MobileFaceNet) save battery.
Offline operation: Local execution without server delays.
Hardware optimization: Using phone NPU/GPU (e.g., CoreML on iOS, NNAPI on Android).
Caching: Predictable scenarios (e.g., re-recognizing the same face) speed up operation.
Example: Snapchat filters work in real-time precisely thanks to such optimizations. So choosing a model with good speed/accuracy balance is one of the key success factors for mobile applications.
# Face detector implementation for mobile devices.importmediapipeasmpimportcv2importnumpyasnpimporttimeclassMobileFaceDetector:"""
Class for face detection in video stream, optimized for
mobile device performance.
Includes frame skipping to achieve target FPS and smooth
box rendering to avoid "flickering".
"""def__init__(self,model_selection=0,min_detection_confidence=0.7):"""
Initialize face detector.
Args:
model_selection (int): Model choice. 0 for short range (up to 2 meters),
1 for long range (up to 5 meters).
min_detection_confidence (float): Minimum confidence threshold for detection.
"""# --- MediaPipe Face Detection Initialization ---# Create instance with specified parameters.self.face_detection=mp.solutions.face_detection.FaceDetection(model_selection=model_selection,min_detection_confidence=min_detection_confidence,)# --- Variables for rendering and FPS ---# Store last successful detections to draw them on skipped frames.self.last_results=None# Store original frame dimensions for correct scaling.self.original_width=0self.original_height=0def_draw_detections(self,frame,detections):"""
Helper function for drawing boxes on frame.
Args:
frame (np.ndarray): Frame to draw on.
detections: Detection results from MediaPipe.
"""ifdetections:fordetectionindetections:# Get relative box coordinates (from 0.0 to 1.0).bboxC=detection.location_data.relative_bounding_box# Scale coordinates back to original frame size.x=int(bboxC.xmin*self.original_width)y=int(bboxC.ymin*self.original_height)width=int(bboxC.width*self.original_width)height=int(bboxC.height*self.original_height)# Draw rectangle on original frame.cv2.rectangle(frame,(x,y),(x+width,y+height),(0,255,0),2)returnframedefprocess_frame(self,frame,target_width=320):"""
Process one frame from video stream.
Args:
frame (np.ndarray): Input frame in BGR format.
target_width (int): Target width for processing. Frame will be
proportionally reduced to this width.
Returns:
np.ndarray: Frame with drawn boxes.
"""self.original_height,self.original_width=frame.shape[:2]# --- Optimization 1: Resolution reduction ---# Preserve aspect ratio.scale=target_width/self.original_widthsmall_frame=cv2.resize(frame,(0,0),fx=scale,fy=scale,interpolation=cv2.INTER_AREA)# --- Optimization 2: Color conversion and performance boost ---# MediaPipe requires RGB. Convert once.rgb_small_frame=cv2.cvtColor(small_frame,cv2.COLOR_BGR2RGB)# Mark frame as "read-only" for acceleration.rgb_small_frame.flags.writeable=False# --- Face detection ---results=self.face_detection.process(rgb_small_frame)# Restore flag if need to work with frame further.rgb_small_frame.flags.writeable=True# --- Drawing ---# If detection was successful, save results.ifresults.detections:self.last_results=results.detections# Draw boxes on original frame. If no faces found in current frame# but they were in previous ones, use old data for smoothness.processed_frame=self._draw_detections(frame,self.last_results)returnprocessed_framedefclose(self):"""Release MediaPipe resources."""self.face_detection.close()# --- Usage example with webcam ---if__name__=='__main__':# Initialize detectordetector=MobileFaceDetector(min_detection_confidence=0.5)# Capture video from webcam (0 - usually built-in camera)cap=cv2.VideoCapture(0)ifnotcap.isOpened():print("Error: couldn't open webcam.")exit()# Variables for FPS calculationprev_frame_time=0new_frame_time=0try:whileTrue:# Read frame from camerasuccess,frame=cap.read()ifnotsuccess:print("Couldn't get frame. Terminating.")break# Flip frame for "mirror" effectframe=cv2.flip(frame,1)# --- Skip processing to achieve target FPS ---# This is less important with new drawing logic, but still saves resources# You can implement your frame skipping logic here if needed# Process frameprocessed_frame=detector.process_frame(frame)# --- Calculate and display FPS ---new_frame_time=time.time()fps=1/(new_frame_time-prev_frame_time)prev_frame_time=new_frame_timecv2.putText(processed_frame,f'FPS: {int(fps)}',(10,30),cv2.FONT_HERSHEY_SIMPLEX,1,(0,255,0),2)# Show resultcv2.imshow('Mobile Face Detection',processed_frame)# Exit on 'q' key pressifcv2.waitKey(1)&0xFF==ord('q'):breakfinally:# Release resourcesprint("Releasing resources...")cap.release()detector.close()cv2.destroyAllWindows()
Recommended Stack:
For detection:
MediaPipe Face Detection (BlazeFace) - optimal for mobile
For tracking:
MediaPipe Face Mesh (468 points) - if landmarks needed
Lightweight OpenPose - for simplified tracking
Performance:
60-100 FPS on average smartphone (Snapdragon 7xx)
Up to 200 FPS on flagships (Snapdragon 8 Gen 2/Apple A15+)
Memory:
Minimum 2GB RAM for basic functionality
3-4GB+ for complex scenarios (simultaneous detection+tracking)
Optimization:
Using TFLite with hardware acceleration (GPU/NPU)
Result caching for static scenes
Dynamic quality reduction during device overheating
Security Systems
Security applications require maximum accuracy with acceptable latency:
# Security system with tracking, verification,# optimized recognition and visualization.importcv2importnumpyasnpimporttimeimportosimportpicklefromtypingimportDict,List,Any,Optional,Tuple# --- Assumes these libraries are installed ---# pip install opencv-python numpy# pip install insightface# pip install retinaface-pytorch deep-sort-realtime## Important: InsightFace requires onnxruntime-gpu. DeepSort also has dependencies.# Installation may require additional steps, including model downloads.fromretinafaceimportRetinaFacefromdeep_sort_realtime.deepsort_trackerimportDeepSortfrominsightface.appimportFaceAnalysisclassAdvancedSecuritySystem:"""
Comprehensive security system combining detection, tracking and
face recognition with real-time optimizations.
"""def__init__(self,db_path:str,detection_thresh:float=0.9,recognition_thresh:float=0.5):"""
Initialize all system components.
Args:
db_path (str): Path to face database file (.pkl).
detection_thresh (float): Confidence threshold for face detector.
recognition_thresh (float): Similarity threshold for face recognition.
"""print("Initializing security system...")# --- Face detector (RetinaFace) ---# RetinaFace works well for detecting "difficult" faces.# Can use 'mobilenet' for CPU, 'resnet50' for GPU.self.detector=RetinaFace(gpu_id=0)# Specify -1 for CPU usageprint("Face detector (RetinaFace) initialized.")# --- Tracker (DeepSort) ---# max_age: how many frames a track can exist without detection.# n_init: how many times object must be detected to start tracking.self.tracker=DeepSort(max_age=30,n_init=3)print("Tracker (DeepSort) initialized.")# --- Face recognizer (InsightFace) ---# Use CUDA for maximum performance.self.recognizer=FaceAnalysis(name='buffalo_l',providers=['CUDAExecutionProvider'])self.recognizer.prepare(ctx_id=0)# ctx_id=0 for GPU, -1 for CPUprint("Face recognizer (InsightFace) initialized.")# --- Parameters and database ---self.detection_thresh=detection_threshself.recognition_thresh=recognition_threshself.face_db=self._load_face_database(db_path)# Dictionary to store already recognized identities by track_id# {track_id: {"identity": "Name", "verified": True/False}}self.tracked_identities:Dict[str,Dict[str,Any]]={}def_load_face_database(self,db_path:str)->Optional[Dict[str,np.ndarray]]:"""Load pre-created embedding database."""ifnotos.path.exists(db_path):print(f"Error: Database file not found at path: {db_path}")print("Please first create database using create_database_from_folder().")returnNonewithopen(db_path,'rb')asf:db=pickle.load(f)print(f"Face database successfully loaded. Found {len(db)} identities.")returndbdef_extract_embedding(self,frame:np.ndarray,bbox:np.ndarray)->Optional[np.ndarray]:"""Extract embedding (feature vector) from face area."""# Safely crop face, clipping coordinates to frame boundariesh,w=frame.shape[:2]x1,y1,x2,y2=np.maximum(0,bbox).astype(int)x2,y2=min(x2,w),min(y2,h)face_img=frame[y1:y2,x1:x2]ifface_img.size==0:returnNone# Use InsightFace to get embeddingfaces=self.recognizer.get(face_img)returnfaces[0].embeddingiffaceselseNonedef_find_match(self,embedding:np.ndarray)->Tuple[str,float]:"""Find most similar face in database."""ifembeddingisNoneorself.face_dbisNone:return"Unknown",0.0best_match="Unknown"best_score=0.0# Use cosine similarity (dot product of normalized vectors)forname,db_embedinself.face_db.items():score=np.dot(embedding,db_embed)/(np.linalg.norm(embedding)*np.linalg.norm(db_embed))ifscore>self.recognition_threshandscore>best_score:best_score=scorebest_match=namereturnbest_match,best_scoredefprocess_frame(self,frame:np.ndarray)->np.ndarray:"""
Full cycle of processing one frame: detection, tracking, recognition.
Returns:
np.ndarray: Frame with drawn information (boxes, IDs, names).
"""ifself.face_dbisNone:cv2.putText(frame,"Face DB not loaded!",(20,40),cv2.FONT_HERSHEY_SIMPLEX,1,(0,0,255),2)returnframe# --- 1. Detection ---# RetinaFace returns dictionary that needs conversiondetections_raw=self.detector.detect(frame,threshold=self.detection_thresh)# Convert to format understandable by DeepSort: [[x1, y1, x2, y2], confidence]deepsort_detections=[]forface_dataindetections_raw:x1,y1,x2,y2,conf=face_datadeepsort_detections.append(([x1,y1,x2,y2],conf,"face"))# --- 2. Tracking ---tracks=self.tracker.update_tracks(deepsort_detections,frame=frame)# --- 3. Recognition and Visualization ---fortrackintracks:ifnottrack.is_confirmed():continuetrack_id=track.track_idbbox=track.to_tlbr()# (x1, y1, x2, y2)identity_info=self.tracked_identities.get(track_id)# OPTIMIZATION: Recognize only new tracksifidentity_infoisNone:embedding=self._extract_embedding(frame,bbox)name,score=self._find_match(embedding)self.tracked_identities[track_id]={"identity":name,"score":score}identity_info=self.tracked_identities[track_id]# --- Visualization ---name=identity_info.get("identity","Unknown")score=identity_info.get("score",0.0)color=(0,255,0)ifname!="Unknown"else(0,0,255)# Draw boxcv2.rectangle(frame,(int(bbox[0]),int(bbox[1])),(int(bbox[2]),int(bbox[3])),color,2)# Form label textlabel=f"ID: {track_id} | {name} ({score:.2f})"# Draw labelcv2.putText(frame,label,(int(bbox[0]),int(bbox[1])-10),cv2.FONT_HERSHEY_SIMPLEX,0.7,color,2)returnframedefcreate_database_from_folder(self,folder_path:str,output_db_path:str):"""
Create embedding database from folder with images.
Folder structure:
- folder_path/
- person_1/
- image1.jpg
- image2.png
- person_2/
- photo.jpg
"""face_db={}print(f"Creating database from folder: {folder_path}")forperson_nameinos.listdir(folder_path):person_folder=os.path.join(folder_path,person_name)ifnotos.path.isdir(person_folder):continueembeddings=[]forimage_nameinos.listdir(person_folder):image_path=os.path.join(person_folder,image_name)img=cv2.imread(image_path)ifimgisNone:continue# Get embedding for first found face in photofaces=self.recognizer.get(img)iffaces:embeddings.append(faces[0].embedding)ifembeddings:# Average embeddings for greater stabilityface_db[person_name]=np.mean(embeddings,axis=0)print(f"-> Found and processed face: {person_name}")# Save database to filewithopen(output_db_path,'wb')asf:pickle.dump(face_db,f)print(f"Database successfully created and saved to: {output_db_path}")# --- Usage example ---if__name__=='__main__':DB_FILE="face_db.pkl"DB_SOURCE_FOLDER="face_images"# Folder with photos for DB creation# --- Step 1: Create database (executed once) ---# For this step, create face_images folder with subfolders containing# people's names and their photographs.ifnotos.path.exists(DB_FILE):print("Database not found. Starting creation process...")# Create temporary folder for example if it doesn't existifnotos.path.exists(DB_SOURCE_FOLDER):os.makedirs(os.path.join(DB_SOURCE_FOLDER,"person_example"))print(f"Created example folder: {DB_SOURCE_FOLDER}/person_example")print("Please place .jpg files with faces there and restart the script.")exit()# Initialize system only for DB creationtemp_system=AdvancedSecuritySystem(db_path=DB_FILE)temp_system.create_database_from_folder(DB_SOURCE_FOLDER,DB_FILE)print("-"*30)# --- Step 2: Run system on video stream ---system=AdvancedSecuritySystem(db_path=DB_FILE)cap=cv2.VideoCapture(0)# 0 for webcam or path to video fileifnotcap.isOpened():print("Error: couldn't open video stream.")exit()prev_time=0try:whileTrue:success,frame=cap.read()ifnotsuccess:break# Process frameprocessed_frame=system.process_frame(frame)# Calculate and display FPScurr_time=time.time()fps=1/(curr_time-prev_time)prev_time=curr_timecv2.putText(processed_frame,f"FPS: {int(fps)}",(20,80),cv2.FONT_HERSHEY_SIMPLEX,1,(0,255,0),2)cv2.imshow("Advanced Security System",processed_frame)ifcv2.waitKey(1)&0xFF==ord('q'):breakfinally:print("Terminating and releasing resources.")cap.release()cv2.destroyAllWindows()
Recommended Stack:
For detection:
RetinaFace (ResNet50) - maximum accuracy for critical tasks
# Face detection and tracking implementation for Edge devices# using TensorFlow Lite.importcv2importnumpyasnpimporttimeimportargparsefromtypingimportList,Dict,Any,Tuple,Optional# This script requires tflite_runtime.# Installation: pip install tflite-runtimetry:fromtflite_runtime.interpreterimportInterpreterexceptImportError:print("Error: tflite_runtime not found. Please install it:")print("pip install tflite-runtime")exit()classEdgeFacePipeline:"""
Class for face detection and tracking on Edge devices using TFLite.
Includes hardware optimizations and lightweight IOU tracker.
"""def__init__(self,model_path:str,device:str='cpu',conf_thresh:float=0.7):"""
Initialize pipeline.
Args:
model_path (str): Path to .tflite model file.
device (str): Device for execution ('cpu' or 'npu').
conf_thresh (float): Confidence threshold for face detection.
"""print(f"Loading TFLite model from: {model_path}")self.interpreter=Interpreter(model_path=model_path)self.interpreter.allocate_tensors()self.input_details=self.interpreter.get_input_details()self.output_details=self.interpreter.get_output_details()# Important: get exact dimensions required by modelself.input_height=self.input_details[0]['shape'][1]self.input_width=self.input_details[0]['shape'][2]self.conf_thresh=conf_threshself.tracked_faces:List[Dict[str,Any]]=[]self.next_track_id=0self.iou_thresh=0.4# IOU threshold for trackingself._configure_device(device)print(f"Pipeline initialized for device: {device}")def_configure_device(self,device:str):"""Apply hardware-specific optimizations."""cv2.setUseOptimized(True)# NPU (Neural Processing Unit) settingsifdevice=='npu':# Here can be specific delegates for NPU, e.g., 'libedgetpu.so.1'# self.interpreter = Interpreter(model_path=self.model_path,# experimental_delegates=[load_delegate('libedgetpu.so.1')])self.interpreter.set_num_threads(1)print("NPU optimizations applied (simplified configuration).")# CPU optimizationselse:self.interpreter.set_num_threads(4)print("CPU optimizations applied (4 threads).")def_preprocess(self,frame:np.ndarray)->np.ndarray:"""
Prepare frame for neural network: resize and normalize.
"""# Resize to exact model input dimensions ---resized_frame=cv2.resize(frame,(self.input_width,self.input_height))# Convert to RGB if model requires itrgb_frame=cv2.cvtColor(resized_frame,cv2.COLOR_BGR2RGB)# Normalization and batch dimension addition# Many TFLite models expect float32 in range [-1, 1] or [0, 1]# or uint8 [0, 255]. Check your model documentation.# Here we assume float32 [0, 1].input_data=np.expand_dims(rgb_frame,axis=0).astype(np.float32)/255.0returninput_datadefprocess_frame(self,frame:np.ndarray)->List[Dict[str,Any]]:"""
Complete processing cycle: detection and tracking.
Args:
frame (np.ndarray): Input frame in BGR format.
Returns:
List[Dict[str, Any]]: List of tracked faces with their IDs and coordinates.
"""original_h,original_w=frame.shape[:2]# 1. Frame preprocessinginput_data=self._preprocess(frame)# 2. Model inferenceself.interpreter.set_tensor(self.input_details[0]['index'],input_data)self.interpreter.invoke()# 3. Get and post-process results# Output format may differ for different models.# Assume model returns [boxes, scores].boxes=self.interpreter.get_tensor(self.output_details[0]['index'])[0]scores=self.interpreter.get_tensor(self.output_details[1]['index'])[0]current_detections=[]fori,scoreinenumerate(scores):ifscore>self.conf_thresh:# Coordinates returned in normalized form [ymin, xmin, ymax, xmax]ymin,xmin,ymax,xmax=boxes[i]# Scale coordinates to original frame sizeabs_xmin=int(xmin*original_w)abs_ymin=int(ymin*original_h)abs_xmax=int(xmax*original_w)abs_ymax=int(ymax*original_h)current_detections.append({'bbox':(abs_xmin,abs_ymin,abs_xmax,abs_ymax),'score':float(score)})# 4. Update trackerself._update_tracker(current_detections)returnself.tracked_facesdef_update_tracker(self,new_detections:List[Dict[str,Any]]):"""Update tracks based on new detections using IOU."""ifnotself.tracked_faces:# If no tracks exist, initialize them from new detectionsfordetinnew_detections:det['track_id']=self.next_track_iddet['age']=0# Track "age" counterself.tracked_faces.append(det)self.next_track_id+=1returnmatched_indices=set()# Try to match new detections with existing tracksfori,trackinenumerate(self.tracked_faces):best_match_iou=0best_match_idx=-1forj,detinenumerate(new_detections):ifjinmatched_indices:continueiou=self._calculate_iou(track['bbox'],det['bbox'])ifiou>self.iou_threshandiou>best_match_iou:best_match_iou=ioubest_match_idx=jifbest_match_idx!=-1:# Update tracktrack['bbox']=new_detections[best_match_idx]['bbox']track['age']=0# Reset age since track foundmatched_indices.add(best_match_idx)else:# Increase age if track not foundtrack['age']+=1# Add new tracks for unmatched detectionsforj,detinenumerate(new_detections):ifjnotinmatched_indices:det['track_id']=self.next_track_iddet['age']=0self.tracked_faces.append(det)self.next_track_id+=1# Remove old tracks that haven't been seen for a whileself.tracked_faces=[tfortinself.tracked_facesift['age']<15]@staticmethoddef_calculate_iou(box1:Tuple,box2:Tuple)->float:"""Calculate Intersection over Union (IOU) for two boxes."""x1,y1,x2,y2=box1x3,y3,x4,y4=box2xi1,yi1=max(x1,x3),max(y1,y3)xi2,yi2=min(x2,x4),min(y2,y4)inter_area=max(0,xi2-xi1)*max(0,yi2-yi1)box1_area=(x2-x1)*(y2-y1)box2_area=(x4-x3)*(y4-y3)union_area=box1_area+box2_area-inter_areareturninter_area/union_areaifunion_area>0else0.0defdraw_results(frame:np.ndarray,faces:List[Dict[str,Any]]):"""Draw results on frame."""forfaceinfaces:# Use coordinates for drawingxmin,ymin,xmax,ymax=face['bbox']track_id=face['track_id']cv2.rectangle(frame,(xmin,ymin),(xmax,ymax),(0,255,0),2)label=f"ID: {track_id}"cv2.putText(frame,label,(xmin,ymin-10),cv2.FONT_HERSHEY_SIMPLEX,0.7,(0,255,0),2)# Usage exampleif__name__=="__main__":parser=argparse.ArgumentParser(description="Face Detection on Edge Devices")parser.add_argument("--model",type=str,required=True,help="Path to the .tflite model file.")parser.add_argument("--device",type=str,default='cpu',choices=['cpu','npu'],help="Device to run inference on.")parser.add_argument("--video",type=str,help="Path to video file. If not provided, uses webcam.")args=parser.parse_args()pipeline=EdgeFacePipeline(model_path=args.model,device=args.device)cap=cv2.VideoCapture(args.videoifargs.videoelse0)ifnotcap.isOpened():print(f"Error: couldn't open video source.")exit()prev_time=0try:whileTrue:ret,frame=cap.read()ifnotret:break# Process frametracked_faces=pipeline.process_frame(frame)# Visualize resultsdraw_results(frame,tracked_faces)# Display FPScurr_time=time.time()fps=1/(curr_time-prev_time)prev_time=curr_timecv2.putText(frame,f"FPS: {int(fps)}",(10,30),cv2.FONT_HERSHEY_SIMPLEX,1,(0,0,255),2)cv2.imshow('Edge Face Detection',frame)ifcv2.waitKey(1)&0xFF==ord('q'):breakfinally:print("Terminating and releasing resources.")cap.release()cv2.destroyAllWindows()
Recommended Stack:
For detection:
YOLOv10n-face (Nano version) – up to 180 FPS on Raspberry Pi
Haar Cascades – minimal requirements (works even on ESP32)
Efficient memory and computational resource management significantly affects system performance.
importgcimporttorchdefoptimize_gpu_memory():"""GPU memory cleanup after processing"""iftorch.cuda.is_available():torch.cuda.empty_cache()gc.collect()defbatch_processing(image_list,model,batch_size=4):"""Batch processing for throughput optimization"""results=[]foriinrange(0,len(image_list),batch_size):batch=image_list[i:i+batch_size]batch_results=model(batch)results.extend(batch_results)# Memory cleanup after each batchoptimize_gpu_memory()returnresults
Multi-threaded Processing
Separating frame reading, processing, and display processes allows maximum utilization of available system resources.
Face detection models can show performance differences among various demographic groups. Many models work less accurately (error rate can be 30% higher) when detecting and tracking faces of people with darker skin tones, women, and elderly people.
Several tips to avoid such situations:
Test on different demographic groups: Always evaluate your chosen model’s performance for different age groups, genders, and ethnicities using diverse test datasets.
Monitor real-world performance: Continuously evaluate how your system works for different user groups in production environments.
Consider specialized models: Some frameworks, such as MediaPipe and newer YOLO variants, were specifically trained on more diverse datasets to reduce bias.
# Example: bias testing frameworkdefevaluate_model_bias(model,test_datasets):"""
Evaluate model performance across demographic groups
"""results={}forgroup_name,datasetintest_datasets.items():detections=[]forimage_pathindataset['images']:result=model(image_path)detections.append(result)# Calculate metrics for this demographic groupaccuracy=calculate_accuracy(detections,dataset['ground_truth'])results[group_name]={'accuracy':accuracy,'sample_size':len(dataset['images'])}returnresults# Usage exampledemographic_results=evaluate_model_bias(model,{'young':young_adult_dataset,'elderly':elderly_dataset,'diverse':diverse_dataset})
Note: Code snippets in this section represent conceptual frameworks. Helper functions like calculate_accuracy, present_consent_dialog, or specific UI implementations should be developed based on your application requirements and chosen frameworks.
Privacy Priority
Choosing between local or cloud data processing can have significant privacy implications:
Local processing advantages:
Personal data never leaves the user’s device
Reduced risk of data breaches
Compliance with regulations like GDPR
User maintains control over their biometric data
Obtaining Consent
Face tracking technologies also raise important questions about consent and transparency:
Best practices for consent:
Users should understand what data is collected and how it’s used
Provide opt-out options for tracking while maintaining core functionality
Periodically ask users to confirm their consent
Implementation example:
classConsentAwareFaceTracker:def__init__(self):self.user_consent=self.check_user_consent()self.tracking_enabled=Falsedefcheck_user_consent(self):# Check saved user preferences# Return consent status and timestamppassdefrequest_consent(self):"""
Present clear consent dialog to user
"""consent_text="""
This app uses face detection for:
- Improving your AR filter experience
- Automatic camera focus on faces
Your face data:
- Processed entirely on your device
- Never saved or transmitted
- Can be disabled anytime in settings
Do you agree to face detection? [Yes/No]
"""returnself.present_consent_dialog(consent_text)defprocess_with_consent(self,frame):ifnotself.user_consent['granted']:returnframe# Return unprocessed frameifself.consent_expired():self.user_consent=self.request_consent()returnself.detect_faces(frame)ifself.user_consent['granted']elseframe
Data Minimization
Implement data minimization principles:
Collect only necessary: If you only need face detection for photo organization, don’t collect identity information.
Minimize storage: Process and delete data as quickly as possible.
Secure storage: If data must be stored, use encryption and access controls.
By implementing these recommendations from the start, you can create face detection systems that respect user privacy, promote fairness, and maintain public trust in AI technologies.
Future Recommendations
The landscape of face detection and tracking solutions continues to evolve rapidly. Here are several key trends worth watching:
Edge optimization remains a key focus, with models becoming increasingly efficient while maintaining accuracy
Privacy priority is gaining importance, with more applications moving processing to devices rather than cloud solutions
Bias reduction is becoming a standard requirement, with frameworks including fairness testing
Compliance tools are emerging to help developers meet evolving privacy laws
Choosing a Model
Choosing the right face detection model depends on balancing your specific requirements. Start with these decision criteria:
For beginners: Start with MediaPipe or YOLOv8-face for their excellent documentation and ease of use
For mobile applications: MediaPipe BlazeFace offers unmatched mobile optimization
For accuracy-critical applications: RetinaFace provides research-grade performance
For edge deployment: YOLOv10-face or EdgeFace offer the best size-performance ratio
For video tracking: ByteTrack provides superior identity consistency between frames
For privacy-conscious applications: Prioritize local models like MediaPipe or lightweight YOLO variants
Always test model performance on your specific data and deployment environment. The metrics in this article provide a starting point, but real-world performance may vary depending on image quality, lighting conditions, and hardware specifications.